> ## Documentation Index
> Fetch the complete documentation index at: https://docs.weav.com/llms.txt
> Use this file to discover all available pages before exploring further.
# Custom actions
> A guide explaining how to connect AI agents to 3rd party API's
 A guide explaining how to connect AI agents to 3rd party API's
Custom actions turn your AI agents from “answering questions” into actually resolving them by leveraging 3rd party API's.
With custom actions, your Weav agents don’t just respond, they **reach into your systems, take action, and complete the job**. That’s the difference between deflection and resolution.
Use them to connect your agents to your backend, internal tools, or third-party APIs so they can do things like look up orders, update subscriptions, or trigger workflows in real time.
***
## What are custom actions?
Custom actions let your Weav agents call your own HTTPS APIs during a conversation.
Instead of stopping at “Here’s what I found,” your agent can:
* Fetch live data from your systems
* Perform approved actions on behalf of the customer
* Return structured results and use them to generate a complete answer
***
## When to use custom actions
Use a custom action when the agent needs to call an external API during a conversation.
**Strong use cases:**
* Looking up order status from your ecommerce system
* Checking subscription, invoice, or billing information
* Creating a support ticket in an internal tool
* Updating a booking or appointment
* Fetching account details from your backend
* Starting a return, exchange, or cancellation flow
**Rule of thumb:**
A guide explaining how to connect AI agents to 3rd party API's
Custom actions turn your AI agents from “answering questions” into actually resolving them by leveraging 3rd party API's.
With custom actions, your Weav agents don’t just respond, they **reach into your systems, take action, and complete the job**. That’s the difference between deflection and resolution.
Use them to connect your agents to your backend, internal tools, or third-party APIs so they can do things like look up orders, update subscriptions, or trigger workflows in real time.
***
## What are custom actions?
Custom actions let your Weav agents call your own HTTPS APIs during a conversation.
Instead of stopping at “Here’s what I found,” your agent can:
* Fetch live data from your systems
* Perform approved actions on behalf of the customer
* Return structured results and use them to generate a complete answer
***
## When to use custom actions
Use a custom action when the agent needs to call an external API during a conversation.
**Strong use cases:**
* Looking up order status from your ecommerce system
* Checking subscription, invoice, or billing information
* Creating a support ticket in an internal tool
* Updating a booking or appointment
* Fetching account details from your backend
* Starting a return, exchange, or cancellation flow
**Rule of thumb:**
If the answer lives outside Weav, use a custom action.
Custom actions work best when your API:
* Has a clear, single purpose
* Returns structured JSON
* Requires defined inputs (like order ID or email)
***
## Before you start
You’ll need:
* An HTTPS API endpoint
* A JSON response from that endpoint
* Any required request headers (like authorization)
* A clear idea of when the agent should use the action
* The inputs the agent must collect before calling it
Custom action URLs must start with `https://`. The API response must be valid JSON.
***
## Create a custom action
**Path:** Settings → Integrations → Custom Action
1. Open **Settings**
2. Go to **Integrations**
3. Select **Custom Action**
4. Click **Create custom action**
***
## General settings
### Name
A short, internal name that clearly describes the action.
**Good examples:**
* `Look up order status`
* `Create return request`
* `Check subscription`
* `Update appointment`
**Best practices:**
* Use action-oriented language
* Be specific about what the action does
* Avoid vague names like `API call`
***
### When to use
This is the most important field.
It tells the agent:
* **When** to call the action
* **What** to collect first
* **How** to use the response
**Good example:**
> Use this action when a customer asks about the status of an order, shipment, or delivery. Before calling the action, collect the customer's order ID and email address. Use the response to explain the current order status, estimated delivery date, and tracking link if available.
**Bad example:**
> Use this to get order info.
***
## API request
 ### Method
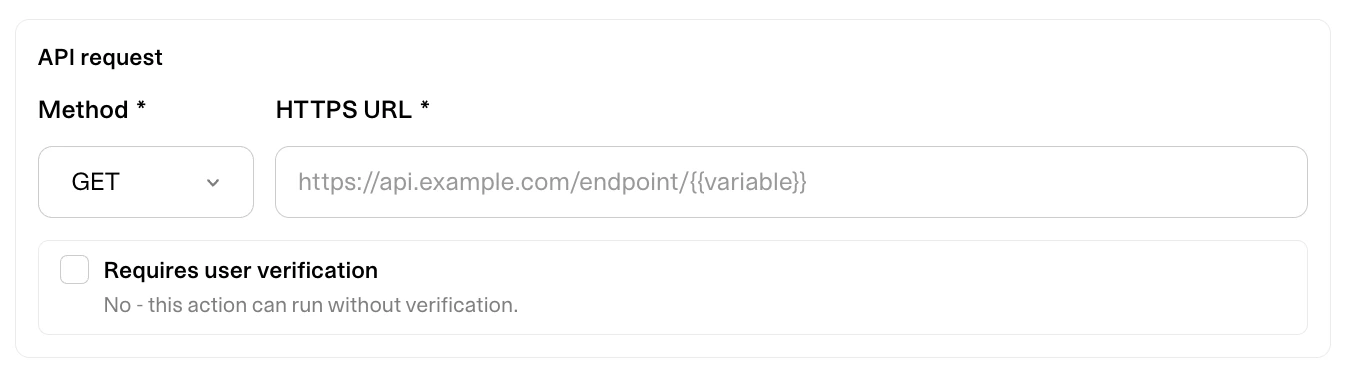
Choose the HTTP method your API expects:
* `GET` → read data
* `POST`, `PUT`, `PATCH`, `DELETE` → change data or trigger workflows
***
### HTTPS URL
Enter the endpoint Weav should call.
```text theme={null}
https://api.example.com/orders/{{order_id}}
```
Use variables with double curly braces:
```text theme={null}
{{order_id}}
```
Weav replaces these with values collected by the agent.
***
### Request parameters
### Method
Choose the HTTP method your API expects:
* `GET` → read data
* `POST`, `PUT`, `PATCH`, `DELETE` → change data or trigger workflows
***
### HTTPS URL
Enter the endpoint Weav should call.
```text theme={null}
https://api.example.com/orders/{{order_id}}
```
Use variables with double curly braces:
```text theme={null}
{{order_id}}
```
Weav replaces these with values collected by the agent.
***
### Request parameters
 Optional query or request parameters.
Use request parameters when your API expects values in the query string or parameter list.
***
### Request headers
Optional query or request parameters.
Use request parameters when your API expects values in the query string or parameter list.
***
### Request headers
 Optional HTTP headers. Use headers for authentication, content type, or other API requirements.
Do not expose private API keys or secrets to customers. Only add credentials that should be used server-side by the custom action.
***
### Request body
For `POST`, `PUT`, or `PATCH`:
```json theme={null}
{
"order_id": "{{order_id}}",
"customer_email": "{{customer_email}}",
"reason": "{{return_reason}}"
}
```
*Must be valid JSON.*
***
## Input variables
Input variables are values the agent can or should collect and pass into the API request. If a variable is required, the agent will try to collect the information from the customer.
| Name | Type | Description | Required |
| ----------------- | ------- | ------------------------ | -------- |
| order\_id | Text | The customer's order ID | Yes |
| customer\_email | Text | Email used for the order | Yes |
| include\_tracking | Boolean | Include tracking details | No |
***
## User verification
Enable Requires user verification when the action should only run after the customer verifies their identity.
Use verification for actions that expose or change sensitive information, such as:
* Billing details
* Subscription changes
* Account updates
* Personal customer data
* Order changes or cancellations
**Important**: If verification is off, the action can run without asking the customer to verify first.
***
## Data access
Data access controls how much of the API response the agent can use.
### **Full**
The agent can use the full JSON response.
Use this when:
* The response is small
* The response does not include sensitive fields
* All returned data is safe and useful for the agent
### **Limited**
The agent can only use selected response paths.
Use this when:
* The API returns sensitive data
* The response is large
* The agent only needs a few fields
* You want more control over what can be used in replies
Example allowed response paths:
* data.status
* data.tracking\_url
* data.estimated\_delivery
If the API returns more fields, Weav will restrict the agent to only the paths you allow.
Limited data access is recommended for most production actions. It keeps the agent focused on the fields it needs.
***
## Action status
Action status controls whether agents can use the custom action.
* Active actions can be used by assigned agents
* Inactive actions cannot be used by agents
Use inactive status when you are still configuring an action, updating an API, or temporarily disabling access.
***
## Assign the action to agents
Optional HTTP headers. Use headers for authentication, content type, or other API requirements.
Do not expose private API keys or secrets to customers. Only add credentials that should be used server-side by the custom action.
***
### Request body
For `POST`, `PUT`, or `PATCH`:
```json theme={null}
{
"order_id": "{{order_id}}",
"customer_email": "{{customer_email}}",
"reason": "{{return_reason}}"
}
```
*Must be valid JSON.*
***
## Input variables
Input variables are values the agent can or should collect and pass into the API request. If a variable is required, the agent will try to collect the information from the customer.
| Name | Type | Description | Required |
| ----------------- | ------- | ------------------------ | -------- |
| order\_id | Text | The customer's order ID | Yes |
| customer\_email | Text | Email used for the order | Yes |
| include\_tracking | Boolean | Include tracking details | No |
***
## User verification
Enable Requires user verification when the action should only run after the customer verifies their identity.
Use verification for actions that expose or change sensitive information, such as:
* Billing details
* Subscription changes
* Account updates
* Personal customer data
* Order changes or cancellations
**Important**: If verification is off, the action can run without asking the customer to verify first.
***
## Data access
Data access controls how much of the API response the agent can use.
### **Full**
The agent can use the full JSON response.
Use this when:
* The response is small
* The response does not include sensitive fields
* All returned data is safe and useful for the agent
### **Limited**
The agent can only use selected response paths.
Use this when:
* The API returns sensitive data
* The response is large
* The agent only needs a few fields
* You want more control over what can be used in replies
Example allowed response paths:
* data.status
* data.tracking\_url
* data.estimated\_delivery
If the API returns more fields, Weav will restrict the agent to only the paths you allow.
Limited data access is recommended for most production actions. It keeps the agent focused on the fields it needs.
***
## Action status
Action status controls whether agents can use the custom action.
* Active actions can be used by assigned agents
* Inactive actions cannot be used by agents
Use inactive status when you are still configuring an action, updating an API, or temporarily disabling access.
***
## Assign the action to agents
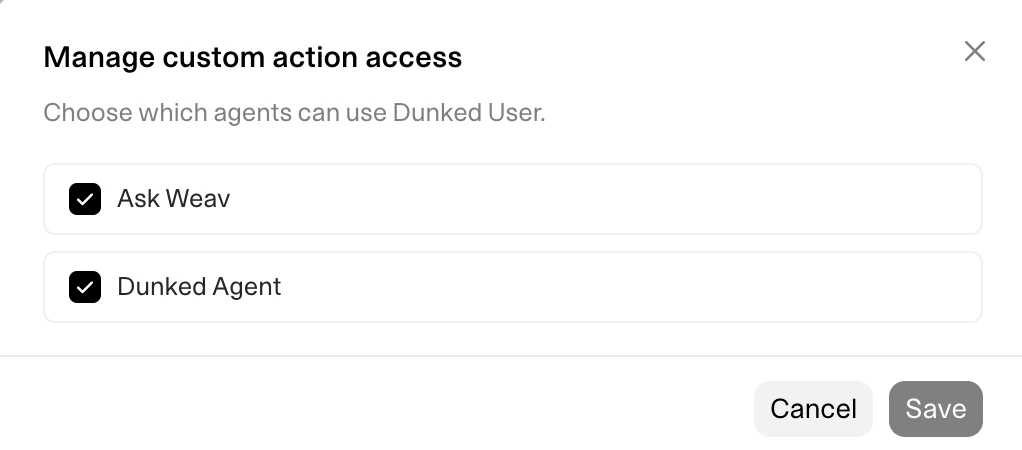 After creating the custom action, choose which agents can use it.
1. Open Settings → Integrations.
2. Select Custom Action.
3. Find the action.
4. Click Manage access.
5. Select the agents that should be allowed to use it.
6. Save your changes.
***
## **Troubleshooting**
### The action is not being used
Check that:
* The action is active
* The action is assigned to the correct agent
* The “When to use” instructions are specific enough
* The agent has enough required inputs to call the action
***
### The API request fails
Check that:
* The URL starts with `https://`
* The endpoint is reachable from the internet
* Required headers are configured
* Required input variables are present
* The request body is valid JSON
* The API returns a JSON response
***
### The response is too large
Custom action responses should be small and focused.
If your API returns too much data:
* Use Limited data access
* Return fewer fields from your API
* Create a dedicated endpoint for the agent
* Avoid returning large arrays or full customer records
After creating the custom action, choose which agents can use it.
1. Open Settings → Integrations.
2. Select Custom Action.
3. Find the action.
4. Click Manage access.
5. Select the agents that should be allowed to use it.
6. Save your changes.
***
## **Troubleshooting**
### The action is not being used
Check that:
* The action is active
* The action is assigned to the correct agent
* The “When to use” instructions are specific enough
* The agent has enough required inputs to call the action
***
### The API request fails
Check that:
* The URL starts with `https://`
* The endpoint is reachable from the internet
* Required headers are configured
* Required input variables are present
* The request body is valid JSON
* The API returns a JSON response
***
### The response is too large
Custom action responses should be small and focused.
If your API returns too much data:
* Use Limited data access
* Return fewer fields from your API
* Create a dedicated endpoint for the agent
* Avoid returning large arrays or full customer records