> ## Documentation Index
> Fetch the complete documentation index at: https://docs.weav.com/llms.txt
> Use this file to discover all available pages before exploring further.
# Set up a custom email
> Connect your own email address (like help@yourcompany.com) so your team can send and receive branded emails in Weav.
## Overview
A custom email lets your workspace use branded addresses like `help@yourcompany.com` instead of only the default Weav address.
Every workspace already has an internal fallback email: [workspace@weav-mail.com](mailto:workspace@weav-mail.com)
You can configure a custom address for:
* **Inbound** (receive customer emails in Weav)
* **Outbound** (send emails from your domain)
* **Both** (two-way email)
Inbound and outbound are verified separately:
* Inbound requires a successful forwarding test
* Outbound requires domain authentication (DKIM + Return-Path)
## Before you begin
Make sure you have:
* Access to **Settings → Inbox Settings** in Weav
* Access to your mailbox provider settings (Gmail, Outlook, etc.)
* Access to your DNS provider (Cloudflare, GoDaddy, Namecheap, etc.)
***
## Step 1: Add a custom email address
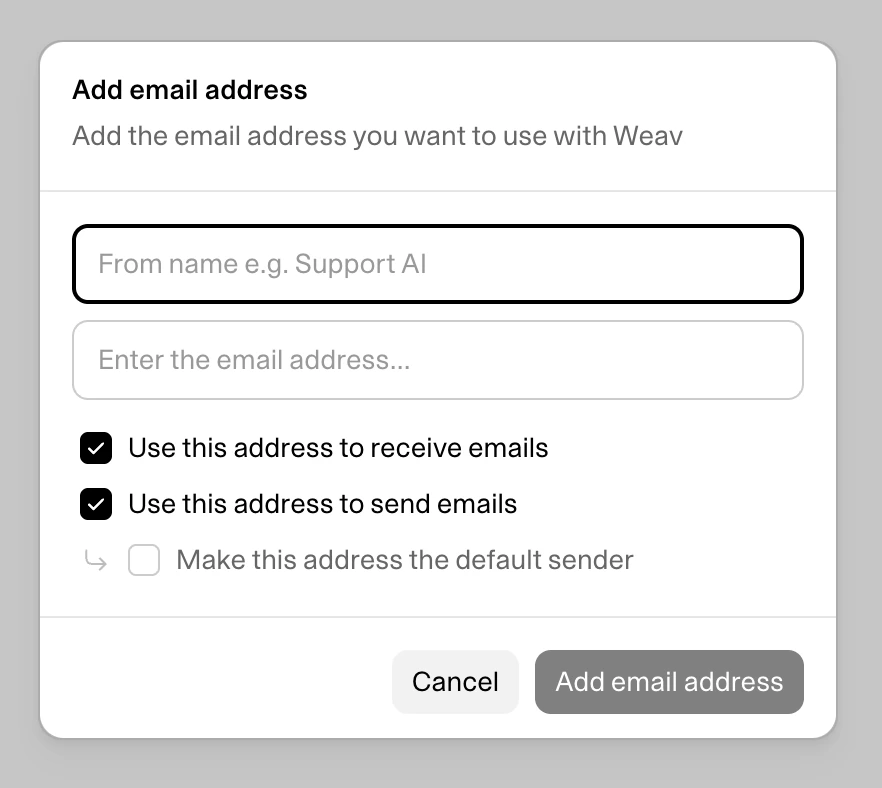 1. Go to **Settings → Inbox Settings**
2. Click **Add Email Address**
3. Enter your address (example: `help@yourcompany.com`)
4. Choose usage:
* Inbound
* Outbound
* Both
5. Save
When you add a non-`weav-mail.com` address, Weav automatically links it to the domain for your workspace.
***
## Step 2: Configure inbound email (receiving)
Inbound works by forwarding your custom mailbox to your workspace’s internal Weav address.
1. Go to **Settings → Inbox Settings**
2. Click **Add Email Address**
3. Enter your address (example: `help@yourcompany.com`)
4. Choose usage:
* Inbound
* Outbound
* Both
5. Save
When you add a non-`weav-mail.com` address, Weav automatically links it to the domain for your workspace.
***
## Step 2: Configure inbound email (receiving)
Inbound works by forwarding your custom mailbox to your workspace’s internal Weav address.
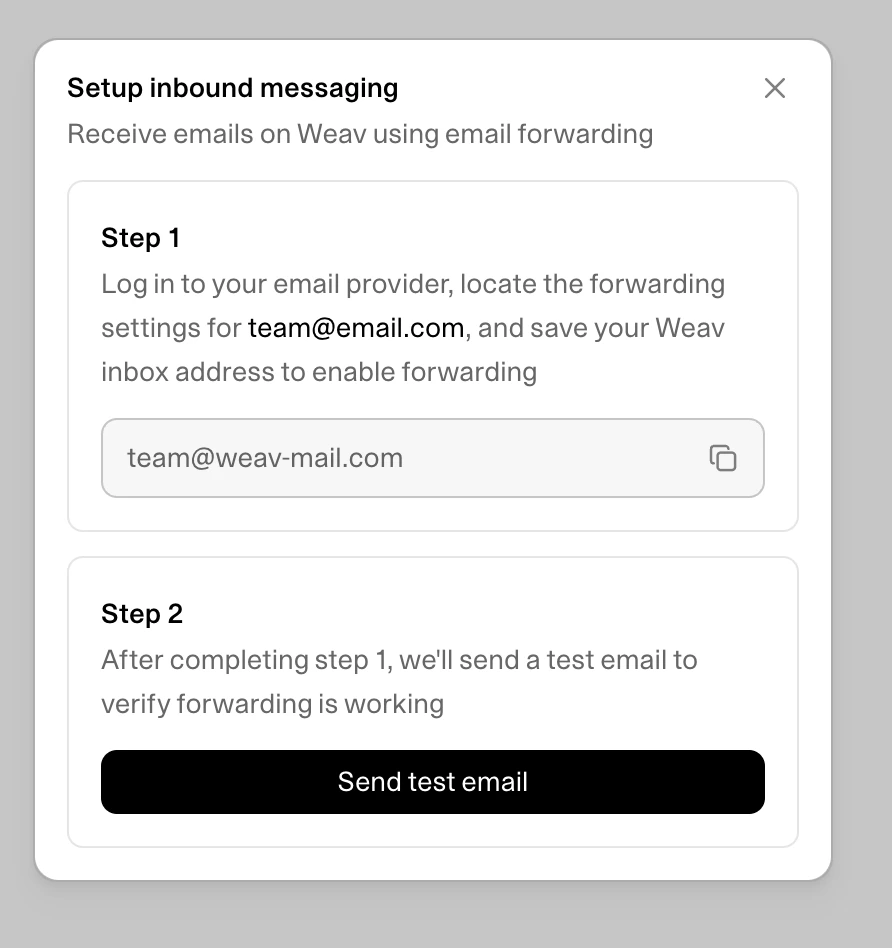 ### 2.1 Copy your internal Weav address
In Inbox Settings, copy: [workspace@weav-mail.com](mailto:workspace@weav-mail.com)
### 2.2 Create forwarding in your mailbox provider
Create a forwarding rule so emails sent to your custom support address are forwarded to the internal Weav address ([workspace@weav-mail.com](mailto:workspace@weav-mail.com)).
### 2.3 Run **Test Forwarding** in Weav
1. In Weav, click **Test Forwarding** for that email address
2. Weav sends a test message from `Weav `
3. If forwarding is configured correctly, the address will automatically be marked verified for inbound use when we detect the forwarded email
If inbound is enabled before verification, Weav will block it until forwarding is verified.
***
## Step 3: Configure outbound email (sending)
Outbound requires domain authentication to improve deliverability and trust.
### 2.1 Copy your internal Weav address
In Inbox Settings, copy: [workspace@weav-mail.com](mailto:workspace@weav-mail.com)
### 2.2 Create forwarding in your mailbox provider
Create a forwarding rule so emails sent to your custom support address are forwarded to the internal Weav address ([workspace@weav-mail.com](mailto:workspace@weav-mail.com)).
### 2.3 Run **Test Forwarding** in Weav
1. In Weav, click **Test Forwarding** for that email address
2. Weav sends a test message from `Weav `
3. If forwarding is configured correctly, the address will automatically be marked verified for inbound use when we detect the forwarded email
If inbound is enabled before verification, Weav will block it until forwarding is verified.
***
## Step 3: Configure outbound email (sending)
Outbound requires domain authentication to improve deliverability and trust.
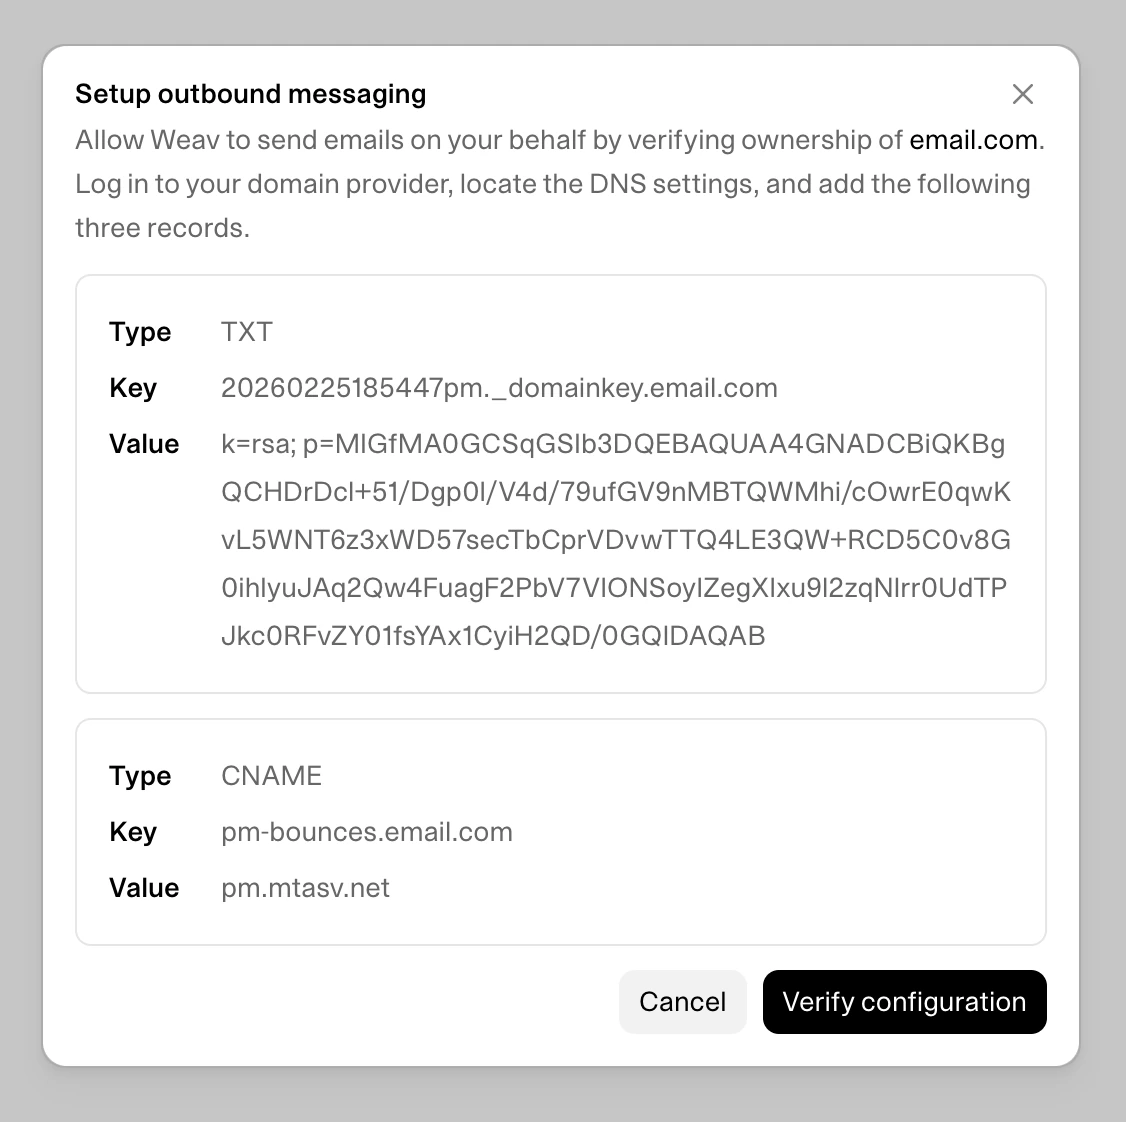 ### 3.1 Open domain setup in Weav
Weav provides the DNS records required for your domain (typically DKIM and Return-Path CNAMEs).
### 3.2 Add records in your DNS provider
Add the exact records shown in Weav.
### 3.3 Verify domain in Weav
After DNS propagation, verify/refresh domain status in Weav.
* If checks pass, status becomes **Verified**
* If DNS is still propagating, status remains **Pending** until checks complete
Outbound cannot be enabled until domain verification is complete. This can take up to 24-48 hours.
***
## Status reference
| Status | Meaning | What to do |
| :--------- | :----------------------------------------- | :------------------------------------- |
| Verified | Setup is complete for that step | No action needed |
| Pending | Waiting for DNS or forwarding confirmation | Wait a few minutes, then refresh/retry |
| Not tested | Forwarding test has not been run | Run Test Forwarding |
| Failed | Verification did not pass | Review setup and retry |
***
## Common errors and fixes
### “Cannot enable inbound email until email is verified”
Run **Test Forwarding** and confirm your custom mailbox forwards to `{workspace}@weav-mail.com`.
### “Cannot enable outbound email until domain is verified”
Check DNS records, wait for propagation, then refresh verification in Weav.
### “Cannot set as default outbound unless outbound is enabled”
Enable outbound first (requires verified domain), then set default outbound.
### “This domain is already being used by another organization”
That domain is already connected to another workspace. Use a different domain or disconnect it there first.
***
## Best practices
* Use team aliases like `support@`, `help@`, or `billing@`
* Keep forwarding enabled for reliable inbound delivery. Don't disable it after setup is complete or it will stop working
* Do not remove DNS authentication records after setup
* Keep one default outbound sender for consistency
***
## FAQ
### Can I add multiple custom email addresses?
Yes. A workspace can have multiple custom addresses.
### Do I need to own the domain?
Yes. You need DNS control for outbound setup.
### Can I remove a domain later?
Yes, but only after no email addresses are using that domain.
### 3.1 Open domain setup in Weav
Weav provides the DNS records required for your domain (typically DKIM and Return-Path CNAMEs).
### 3.2 Add records in your DNS provider
Add the exact records shown in Weav.
### 3.3 Verify domain in Weav
After DNS propagation, verify/refresh domain status in Weav.
* If checks pass, status becomes **Verified**
* If DNS is still propagating, status remains **Pending** until checks complete
Outbound cannot be enabled until domain verification is complete. This can take up to 24-48 hours.
***
## Status reference
| Status | Meaning | What to do |
| :--------- | :----------------------------------------- | :------------------------------------- |
| Verified | Setup is complete for that step | No action needed |
| Pending | Waiting for DNS or forwarding confirmation | Wait a few minutes, then refresh/retry |
| Not tested | Forwarding test has not been run | Run Test Forwarding |
| Failed | Verification did not pass | Review setup and retry |
***
## Common errors and fixes
### “Cannot enable inbound email until email is verified”
Run **Test Forwarding** and confirm your custom mailbox forwards to `{workspace}@weav-mail.com`.
### “Cannot enable outbound email until domain is verified”
Check DNS records, wait for propagation, then refresh verification in Weav.
### “Cannot set as default outbound unless outbound is enabled”
Enable outbound first (requires verified domain), then set default outbound.
### “This domain is already being used by another organization”
That domain is already connected to another workspace. Use a different domain or disconnect it there first.
***
## Best practices
* Use team aliases like `support@`, `help@`, or `billing@`
* Keep forwarding enabled for reliable inbound delivery. Don't disable it after setup is complete or it will stop working
* Do not remove DNS authentication records after setup
* Keep one default outbound sender for consistency
***
## FAQ
### Can I add multiple custom email addresses?
Yes. A workspace can have multiple custom addresses.
### Do I need to own the domain?
Yes. You need DNS control for outbound setup.
### Can I remove a domain later?
Yes, but only after no email addresses are using that domain.